In the past, we’ve covered all of the keyboard shortcuts in Windows, showing you how to use the fastest input method to be the most efficient at your desktop and laptop. Some of those shortcuts are simple but powerful because they work everywhere in the operating system (like Ctrl+C and V), but others launch full features of the OS that you might not use very often. Today, we’ll focus on Win+Tab, a shortcut that unlocks Windows’ desktop and window management features in an interface called “Task View.” You can also access this interface by pushing the Task View button, which is likely on your taskbar already, and looks like this:
![]()
1) Extending (or Replacing) the Classic Alt+Tab Combination
At first glance, Win+Tab is an update to the old Alt+Tab combination, which is the window switcher. You can use Alt+Tab to quickly switch between running programs. When you use it, window previews pop up to help you differentiate between windows of the same program (like two or more Chrome windows that are open at the same time). You can also hold Shift while using Alt-Tab to cycle through the windows in reverse order.
Win+Tab can accomplish the same switching function, but adds a lot more features to it. Simply push Win+Tab to see all of the thumbnails, and use the arrow keys to scroll to the window you’d like on top, and push Enter. If you’d like, you can also grab the mouse to select what you want. This has the added benefit of allowing you to click the little “X” in the corner if you want to close any windows. All of these features are an update to Alt+Tab, but a big difference is that the Task View doesn’t require you to keep holding the keys once you press them.
2) Access your File History Quickly
Another feature that lives in the Task View Interface is Timeline, which is a unified history of tasks and files. You might find your browsing history here (if you use Edge), as well as files that you’ve accessed recently. It also integrates across your Windows devices if you’re signed in to your account, so you can pick up something you left off on another device later. This history can be really helpful for opening files that you’ve saved recently, but don’t remember which folder you saved it in—plus, hovering over the filename will give you the file’s path as well. You can also search here by clicking the search icon on the upper right hand side.
3) Manage Privacy Settings for Your Timeline
The Settings app contains a page that helps you better control what shows up on your Timeline. Here, you can choose which accounts of yours get synced, as well as deselect the options to “collect activities from your PC,” or enable “sync activities from this PC to the cloud.” If you want to hide your history from the task view, this is the place to do it as a general rule.
If, on the other hand, you want to only selectively remove some things from your timeline, you do that by opening the Task View with Win+Tab and right clicking the file you don’t want listed. You can also ask Timeline to forget about a whole day at a time. This could be time consuming if you needed to clean it up regularly; on the other hand, you probably shouldn’t be sharing a workstation and account with someone who you don’t trust with all of your data anyway.
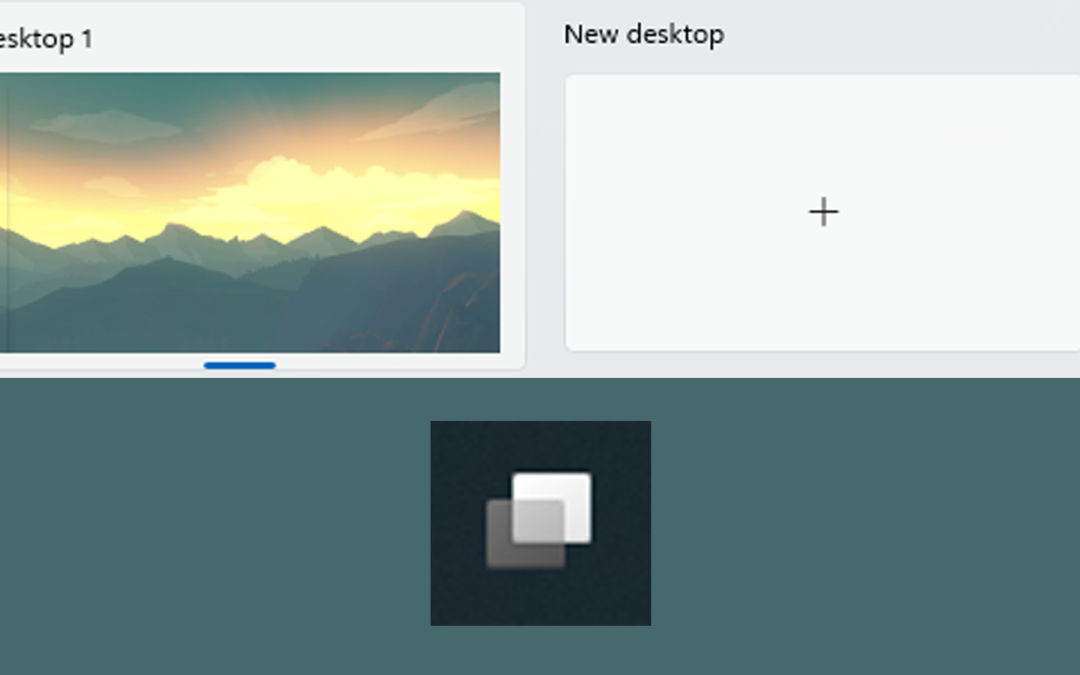
4) Virtual Desktops to Get Organized and Productive
Virtual Desktops are a way to organize your windows by making full desktops with their own windows. There are a number of useful combinations here for settings: you can show certain apps on all desktops, keep them all separated, or move windows between them. To get started, you can push Win+Tab and click on “+ New desktop” at the top (you can also start a new desktop, without entering task view, by pushing Win+D). The view will change slightly to show Desktop 1 and Desktop 2, and the new desktop will be empty. When you click on it, it appears as though you don’t have any running apps or windows, so you can open new ones that will be grouped together on this desktop. This helps you keep multiple projects going at once, without having all of the clutter of interacting with all of your windows at once.
Now that you have multiple desktops, you can move existing windows from one to another by right-clicking them in Task View, and selecting “Move To…” then Desktop 2 or a New Desktop. You can also see (in this right-click context menu) that you could keep certain apps on every desktop. This could help a lot if you need to monitor something specific in real-time on every desktop, while changing all of your other windows by moving to a different desktop. The next step to organizing your desktop spaces is to add Fancy Zones from the PowerToys collection to use custom zones to place specific windows in. With the two of them together, you could have a well planned workflow that you can build lightning fast each time you power cycle the computer.
-Written by Derek Jeppsen on Behalf of Sean Goss and Crown Computers Team